Facebook has a serious bug where animated pictures can easily be uploaded to Facebook. The bug existed in from earlier days since I wrote about many articles regarding this. Initially, people were able to post animated pictures using a piece of customized code. Then, we were able to have animated picture as cover photo on Timeline. But recently, I posted a method to share a page with animated pictures. It was a new trick working from this year, 2013. Now, you will learn how to upload animated picture in Facebook Page Tab.
Some of the tricks which existed were patched by Facebook. Those were bugs and taking that bug as an advantage, we were able to post animated pictures on Facebook. Still people find bugs on Facebook and animated pictures is being posted on the great social networking site, Facebook. Using a bug, now we will be able to upload animated pictures in Facebook Page tab.
Before getting started, as we are going to upload animated pictures in page tab, we need an application like Static HTML: iframe Tabs which can be added to our page.
You need the following before getting into this tutorial.
- A Facebook Page
- Adobe Photoshop CS5 (or any version that supports animation)
- Quick Time Player (as a plugin for Adobe Photoshop)
Follow the below steps to upload animated picture in Page tab image. Also, share the animated picture with your fans or friends.
Step #1: Search for any animated pictures (GIF) on Google or create a GIF image. Download to your computer.
Step #2: Open Adobe Photoshop CS5 and go to File > Import > Video frames to layers. In the File Name combo box, just type *.* and choose your GIF image.

Step #3: After opening, you can also set beginning and ending point of the GIF to be inserted in Photoshop. If you don't want any limits, you may choose the option "From Beginning to End".
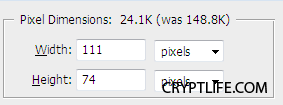
Step #4: Press Alt + Ctrl + I and re-size the picture. Here, you have to set a size for your GIF so that it would fit on your application tab of your Facebook page. Set a size of 111 x 74 pixels.

Step #5: Now make sure that you are able to view all frames of your animation by launching the Animation window using Window > Animation.
Step #6: Save your file in the filename.psd format. While saving, see that you have checked on Layers.

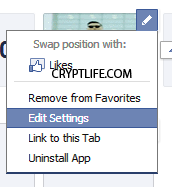
Step #7: Now, after saving log in to your Facebook account and land on your page. As said earlier, you should have added an application Page tab on your page. I consider that you have already added an application on your Page tab. So, click on the pencil icon on your tab which appears when you hover on it. Just click on the Edit Settings option.

Step #8: Using Change option in the custom tab image, upload the filename.psd that you have saved. And, voila! it's done. You can now see your GIF animating on your page tab.
To Share your Page with Animated Pictures, head here.
If you have any queries, please let me know below. I am happy to help you. Please subscribe us if this helped you.
