Have you ever searched for Facebook Cover photo on Google or vendors who provide cover photo for Facebook profiles? If you have, then you must be surely known about this effect. you might have seen people having such cover pictures. For example, have a look at my cover picture below. Well, you might have seen such pictures but you may not be aware of this effect. This is known as Droste effect.
Droste effect is usually applied on pictures to get a image inside another image. By looping this, you will get a sequence of image in a single image. Well, you might have experienced this effect when you show your web cam in the window where picture preview is shown on your monitor.
I hope you have got an idea about droste effect on pictures. You can make a droste effect on pictures using Photoshop. Sometimes, people move on with this paragraph when I said it as 'Photoshop'. Photoshop is easy when you know some tricks to apply in it. I will show you a step by step tutorial for making a Facebook cover picture with droste effect. 
You can apply droste effect for normal pictures using a plug in available in Adobe website. Usage of a plug in might make your work easier in Photoshop. But there is a way to apply this effect without using a plug in. Applying this effect without a plug in must be done with much care.
First, let me teach you this effect by using a plug in.
Step 1: You need a Adobe Photoshop CS5 or CS4 for using Plug in. This is because, the plug in is compatible only with Photoshop CS5 or CS4. It's better, if you use CS5.
Step 2: Download Pixel Bender Plug in from: http://labs.adobe.com/technologies/pixelbenderplugin/
Step 3: Install the Plug in using Adobe Extension Manager.
Step 4: Open the Picture you want to apply Droste effect in Photoshop.
Step 5: Select the part of the picture where you have planned to apply Droste and make it as a separate layer using keyboard shortcut Ctrl + J or by using menus Layer > New > Layer via Copy.
Step 6: Make the layer visible in which you want to apply Droste. This can be done by click on the eye icon in the Layers Panel in Photoshop.  Step 7: Now make the picture to fit in your Image size.
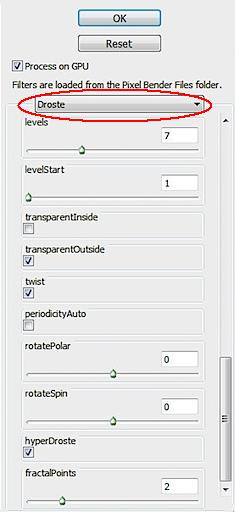
Step 8: Choose Filter > Pixel Bender and select Droste option from the drop down menu. Adjust the values to make your picture look good.  Step 9: When you finalize your preview, you can click the OK button to apply Droste effect to your picture.
You may use the above method to apply Droste effect for any type of picture. Not only, a Facebook Cover Picture.
Now let me teach you the other method in which you can apply Droste in your Facebook cover picture.
You may use any version of Photoshop for doing this tutorial but don't go for more older ones. It may not have certain features.
Step 1: For easier editing in Photoshop, set a white background as your Cover photo.
Step 2: Capture a screenshot of your Facebook Timeline and crop the picture so that your new cropped image shows from header of Facebook to the part below your name. You may cover a small part of your Friends, Photos and Subscribers tab for better results.
Step 3: Paste the Picture in Photoshop by creating a new file with transparent background fill.
Step 4: Use Magic wand Tool  and select the white coloured cover picture of your Timeline. Press Delete key to remove them. When you remove them, the area becomes transparent showing the layer background at the back.
Step 5: Now Select all, the picture and Copy it.
Step 6: Paste it in the same picture and Press Ctrl + T to resize it to fit right in your Cover space (the area you've removed) in the picture.
Step 7: Remember that you will be having a copied picture in your clipboard. Therefore, repeat the Step 6 for creating a sequence of cover picture so that your effort looks nearly like a Droste effect.
When you are completed, you can save a JPEG form of the picture to use it as your Cover Picture on you Facebook timeline. It's now time to get likes to your cover picture from your friends and make them ask how you did it.
Share your experiences and thought about this effect on a Facebook Cover Picture here, in comments.

Thanks for sharing a great tool! Definitely helps our readers.