Recently, I wrote three articles regarding how to post animated pictures on Facebook. I got good feedback from that. So, I would like to share another trick to post animated pictures on Facebook Page, I mean, posting as Page and not with your name. My recent article to post animated pictures on Facebook worked well with personal timeline and groups. But still, after researching more, I found a method to post animated pictures on Facebook Page as a Page. The method looks complicated but more simple to post animated pictures on Facebook
Requirements:
The requirements of this tutorial requires the following:
- Facebook Page: A Facebook Page which must be administered by you so that you can post animated pictures as a page on your Facebook page.
- Animated Pictures on Cover Photos or Milestones: The second requirement is the picture you will be posting on Page. Remember, the picture must be uploaded to your photo page's photo album. Refer the tutorial to upload animated picture on Facebook Page.
- Facebook Application: A Facebook application will help you to post animated pictures on Facebook page. I will teach you how to create an app and use them.
From, now, the steps are to be followed for posting animated picture on your Facebook Page. Before continuing, make sure that you have at least one animated picture uploaded on your page. If, not use the link which I specified above to how to upload animated pictures on Facebook page.
#1 Creating an Application:
The method to create an application is simple than you expect. Just visit Facebook App Developer site and press Create a New App. Enter the name of the application and hit Continue button. You're done! Simple, Right? Just try them.

#2 Getting Access Token:
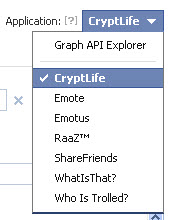
Now drive yourself to Facebook Graph API Explorer page and the selected new application is to be chosen. Select the application using the Application drop down box which will be available at top right corner of the page.

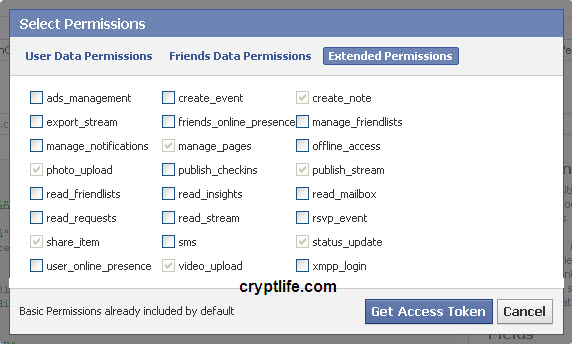
After selecting the application, just click on the Get Access token button. Now, select the choices as shown in the below picture. the ajax dialog box will have 3 tabs. In the User Data Permissions tab, select publish_actions. In the Extended Permissions tab, you need to select multiple choices. Follow the image below.
Note: If you see different options from the dialog below in Graph API Explorer, have a look at the end of the post for the update. It has got updated, I hope.

Select all item which I have selected above and press Get Access Token button. You will be asked to authorize the application. Just Allow the application. Now click on Submit button which will be available below Get Access token button.
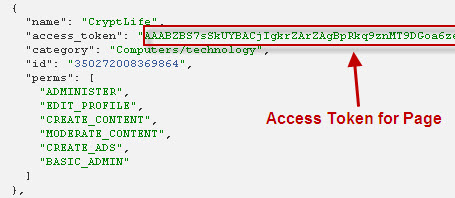
Now, this step is not yet completed. Click on the accounts link which will be available below the Connections. By clicking them, it will display your page's access token. See a sample below and note the access code which you generated. Copy them and paste it in a notepad for easy and future use. To post as a page, you require an access token of a page and not yours.

#3 Posting Animated Picture:
Well, the last part of the tutorial. The thing is, just you have replace all some of the values in the below code. But before continuing, as I said already, open the animated picture which you uploaded in your page in a theater mode. Copy the fbid value from the URL.
https://graph.facebook.com/PAGE_ID/feed?method=post &message=CUSTOM_MESSAGE &object_attachment=PICTURE_ID &name=CUSTOM_NAME &caption=CUSTOM_CAPTION &description=CUSTOM_DESCRIPTION &access_token=ACCESS_TOKEN
PAGE_ID is the ID of your page where you want to post. You can use the username too here. CUSTOM_MESSAGE will be the message to be posted when you publish the animated picture. PICTURE_ID is the value of fbid of the picture which you uploaded to your page. CUSTOM_CAPTION can be any cation you like for the animated image you try to post. CUSTOM_DESCRIPTION can be any text to describe the picture you post. ACCESS_TOKEN is the one which identifies your application. The one which you generated in the step 2 should be used here.
Access tokens are the permission for an application to use user's data. This is a temporary one and will get expired after sometime.
That's it. After replacing all the values in the code, it's time for you to launch. Paste the code into your address bar and hit enter. Check your page whether the process is success or not.
Watch the video tutorial if you were not able to follow some steps above.
[youtube vTygJsSqHgQ]
If you have any queries, just drop your comments below. Don't forget to Like us on Facebook.
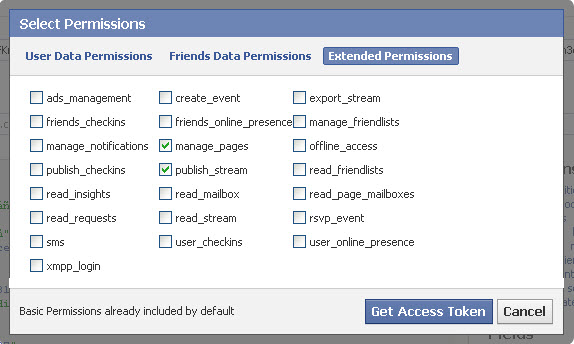
Update: If the permission box above doesn't appear the one like the above or if you get a dialog similar to the below image, you may select publish_stream and manage_pages in Extended Permissions tab. 
